With our programmable CDI, the ignition map, ignition voltage, the polarity of the pulse generator switching edge, sensor type and parameters as well as the side stand monitoring can be configured. The CDI is suitable for users who are familiar with the technical basics of engines and engine tuning.
In principle, it can be used for any motorcycles in which a CDI system is used or can be installed.
Required parts
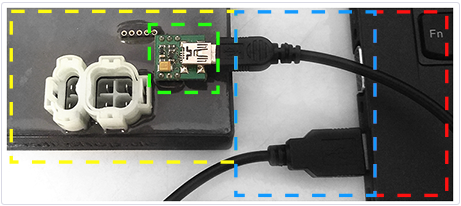
All required accessories are available in our shop.
The converter with its six pins is plugged into the CDI. Connect the USB cable to the converter on one side and the computer or laptop on the other. The CDI also receives the supply voltage required for programming via the cable.
Please note
- If the pins of the converter do not fit into the CDI sockets right away, please do not use force, but bend the pins into shape carefully.
- Like all electronic components, the converter and the CDI can suffer damage if you are electrostatically charged and touch the converter or the CDI sockets. To be on the safe side, you should first discharge yourself statically on a grounded object, e. g. a radiator.
Software
Our programmable CDIs are configured with our CDI Tuner software. Below is a link to the software and the required drivers.
| CDI Tuner | Required drivers |
|---|---|
| Our software is available for download as an archive. For unpacking we recommend the free program 7-Zip. Our software itself only needs to be unpacked and does not require any installation. | For your computer to be able to communicate with the CDI, drivers must be installed. You can obtain these directly from the chip manufacturer Silicon Labs via the following link. Please make sure you select the correct driver for your version of Windows. |
| Download | Link to download page |
Profile presets
There are preconfigured profiles for the following motorcycles, which can be modified as required. In general, these can also be used as templates for other motorcycles if they have similar parameters. If your motorcycle is not listed, please read on in the section Special Applications below.
![]() Honda Transalp XL600V (PD06)
Honda Transalp XL600V (PD06)
![]() Honda XRV650 Africa Twin (RD03)
Honda XRV650 Africa Twin (RD03)
![]() Honda XRV750 Africa Twin (RD04/RD07)
Honda XRV750 Africa Twin (RD04/RD07)
![]() Honda Dominator NX500 (PD08)
Honda Dominator NX500 (PD08)
![]() Honda Dominator NX650 (RD02/RD08)
Honda Dominator NX650 (RD02/RD08)
![]() Honda XR650L (RD06)
Honda XR650L (RD06)
![]() Honda NX250 (PD08) *
Honda NX250 (PD08) *
![]() Honda DAX *
Honda DAX *
![]() Skymax ST50 *
Skymax ST50 *
![]() Vespa Piaggio ET4 *
Vespa Piaggio ET4 *
![]() Aprilia RS 125 MP *
Aprilia RS 125 MP *
* Please note: While we can provide well-tested profiles for many motorcycles, those marked with a star are less tried and tested in practice. They were mainly developed in cooperation with drivers. Although they are already being used successfully, there may still be a need for optimization and improvement due to the lower experience values. Depending on the motorcycle, smaller modifications are also necessary, e.g. the construction of a plug adapter or a little soldering to enable the power supply of the CDI via the 12V on-board power supply. When using our CDI in these motorcycles, we therefore recommend a certain basic technical understanding and the willingness to experiment and modify a bit if necessary.
Main window
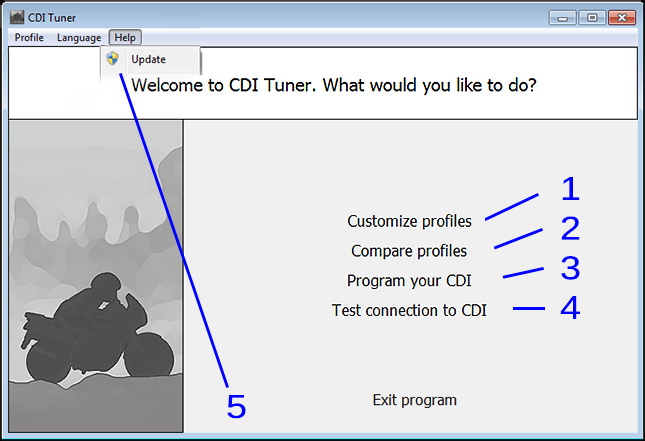
| [1] | Customize profiles | Use this button to create and manage custom profiles (see below). |
|---|---|---|
| [2] | Compare profiles | Use this button to compare two or more profiles in a common diagram. |
| [3] | Program your CDI | If a CDI is already connected, this can be programmed from the main window with a profile of your choice. Our CDIs can be reprogrammed during operation (e.g. useful for measurements on the test bench or with a stroboscope). |
| [4] | Test connection to CDI | After connecting the CDI to your computer, this button can be used to perform a connection test. For this purpose, a message is sent to the CDI and its response is awaited. Provided that the CDI has been connected correctly, it signals its readiness. If the connection test fails, first check the contacts of the converter and the cable and make sure that the drivers for the converter have been installed. |
| [5] | Update | Use the help menu to search for available updates for CDI Tuner and keep the software up to date. This also includes improvements to motorcycle profiles and new motorcycle profiles. |
Customize Profiles
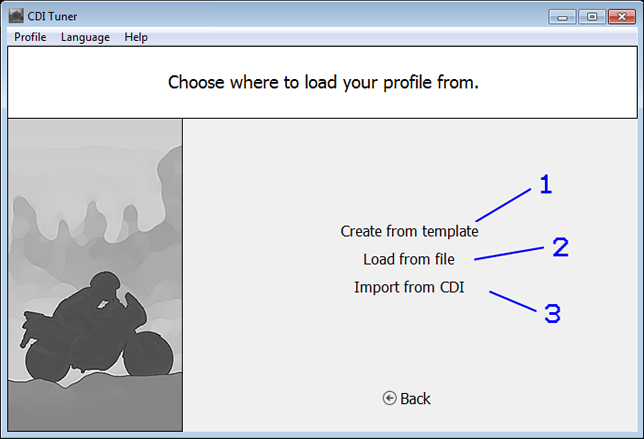
User-defined profiles are managed in this window. To edit your profiles, the software then navigates you to the profile editor (see below).
| [1] | Create from template | Profiles can be created by loading and editing a template. See below for more details. |
|---|---|---|
| [2] | Load from file | If you have already created a profile, you can load it from a data carrier and continue editing it. |
| [3] | Import from CDI | You can also import the profile currently stored on the CDI for editing, provided that it is connected. |
Create profile
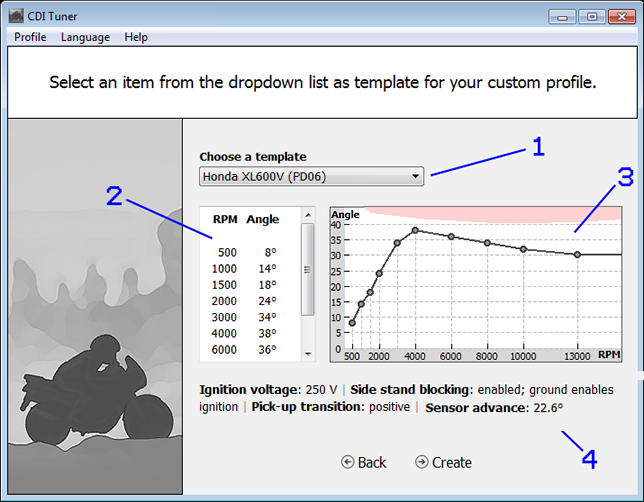
In this window, a template for creating a user-defined profile is selected. Once created, the software will navigate you to the Profile Editor (see below).
| [1] | Choose a template | To create a new motorcycle profile, first select a template. The drop-down list shows the motorcycle types currently supported. The update function in the help menu allows you to keep the list up-to-date. |
|---|---|---|
| [2, 3] | Ignition map | These elements show the ignition map of the selected profile. On the left, the speeds and ignition angles are listed in tabular form, on the right, graphically in a diagram. |
| [4] | Additional parameters | Depending on the selected profile, there are additional changeable parameters. These are briefly summarized below. |
Profile editor
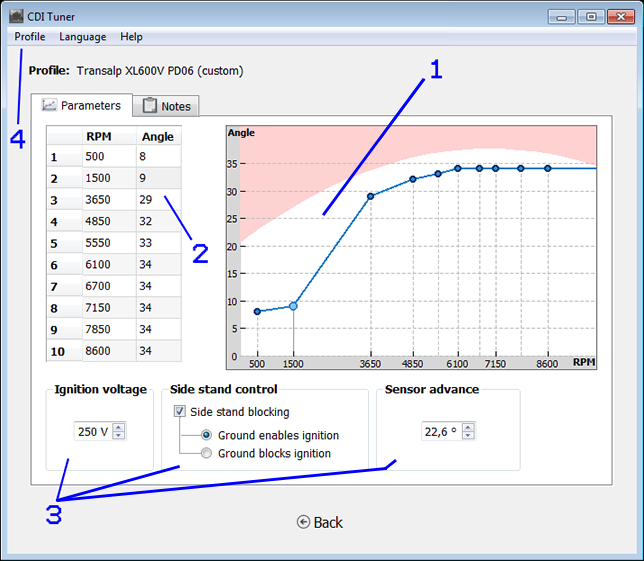
This window is used to edit user-defined profiles.
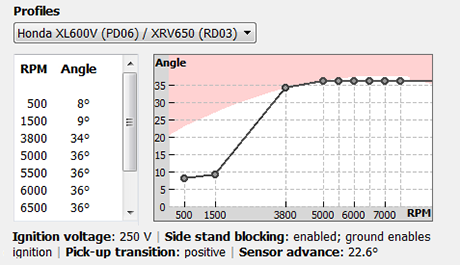
| [1, 2] | Ignition map | The ignition map indicates at which crankshaft angle before the top dead center (TDC = highest position of the piston in the cylinder) depending on the engine speed the ignition of the spark plug is triggered (for details see e.g. Wikipedia). The ignition map in the CDI Tuner is determined by ten points and the curve is interpolated linearly between them. Each point indicates the desired ignition angle for a given engine speed (RPM). The values can be entered manually in the table or by moving the points in the graph with the mouse up to the constructively given red area. The transition between the white and red area shows the maximum possible values. |
|---|---|---|
| [3] | Additional parameters | Depending on the type of motorcycle, various other settings can be made on the profile. Ignition voltage: The value of the ignition voltage determines the voltage to which the ignition capacitor(s) are charged before the ignition is triggered. For more details please click here. Side stand monitoring: If this check mark is set, the ignition is blocked or enabled depending on the logic state of pin 2. For this purpose, the wire at the CDI (if present) must be cut (described e.g. here). If side stand monitoring is activated, it must finally be selected whether the ignition is to be enabled or blocked if the existing monitoring logic on the motorcycle connects pin 2 with battery minus (ground). Pulse generator edge: This setting determines whether the CDI is to be triggered by the rising or falling edge of the (positive) pulse generator voltage. So e.g. with the Honda Transalp with rising switching edge: If the pulse generator voltage rises starting from 0V and reaches the trigger threshold of +2V, the CDI knows that the crankshaft is at a certain angle in front of the TDC at this moment. Sensor advance: The sensor advance indicates the value of this angle. This allows the CDI to calculate how long it will have to wait before triggering the ignition, depending on the current engine speed. For example, if this value is too high, it will wait too long. This would mean that the entire ignition map is shifted in a late direction. The value to be entered is the corresponding angle at low speed. The typical pulse generator for motorcycles is an inductive generator, which unfortunately emits a higher signal voltage with increasing speed. This means that this angle increases with higher engine speed, which is why the exact values have to be measured individually. We have taken this into account for our supported motorcycle profiles. With other pulse generator systems, corresponding deviations from the programmed ignition map may have to be corrected (e.g. check with stroboscope). |
| [4] | Profiles menu | Via the menu you can load and save profiles or program the CDI at any time. |
Special applications
If there is no predefined profile in our software for your motorcycle (yet) or if you need a customized CDI, we will be happy to help you with the implementation. Running a self-adapted CDI is not difficult. As a rule, you only need to connect:
- the power supply (12V on-board power supply via fuses, ignition switch, and kill switch),
- the ignition coil(s),
- the pulse generator,
- and maybe side stand monitoring.
Due to the endless number of different motorcycle types there are unfortunately also a lot of different CDIs. There are, for example, various connectors, pin assignments, electrical characteristics, types of power supply for the system/charging coil and, last but not least, pulse generators with very distinct differences in the output signal.
However, technical data and motorcycle circuit diagrams can usually be obtained. Adapters can be built for connectors, unsuitable ignition coils are inexpensive to replace. The pulse generator behavior can be measured with more or less great effort, and the pulse generator can be completely replaced or retrofitted, depending on the desired accuracy of the programmed ignition map.
Examples
HONDA 250, 650, Dax and Yamaha SR500
Among other things, we have operated the HONDA 250, 650, Dax as well as a Yamaha SR500 with a minimally modified programmable CDI (only one ignition capacitor) and the corresponding profiles of our software. For the latter, some adaptations were initially necessary (ignition coil, Hall sensor system, wiring), but the result was very impressive.
Realization of speed limitation
Another application is in mopeds with speed limitation. Usually, the engine is throttled via the carburetor intake port. Our CDIs offer a better solution for this, which is described in our FAQ.
There are many ways to use our programmable CDIs. Please feel free to contact us if you have any questions.

